Picture this: You turn on your faucet and wait... and wait... and wait. The water comes out lukewarm or cold, even though your heater is running. This frustrating scenario happens when your home's hot water system isn't circulating properly. Enter the hot water recirculating pump – that little device that makes sure hot water reaches your tap quickly. But understanding how to read and interpret installation diagrams for these pumps can seem like solving a puzzle with missing pieces. Let's take a closer look at what those lines, symbols, and labels really mean.
Hot water recirculating pumps are the unsung heroes of modern plumbing systems. They eliminate the wait time between turning on a faucet and getting hot water. But before you can install one, you need to understand how to read the installation diagrams that guide the process. These diagrams might look like a foreign language at first glance, filled with strange symbols and confusing connections. However, once you learn to recognize the patterns and understand the logic behind them, they become incredibly helpful tools. Whether you're a DIY enthusiast tackling a home improvement project or a professional plumber trying to troubleshoot a system, knowing how to interpret these diagrams is essential. Think of it as learning the secret code that unlocks the secrets of efficient water heating systems.
What You'll Find on a Typical Installation Diagram
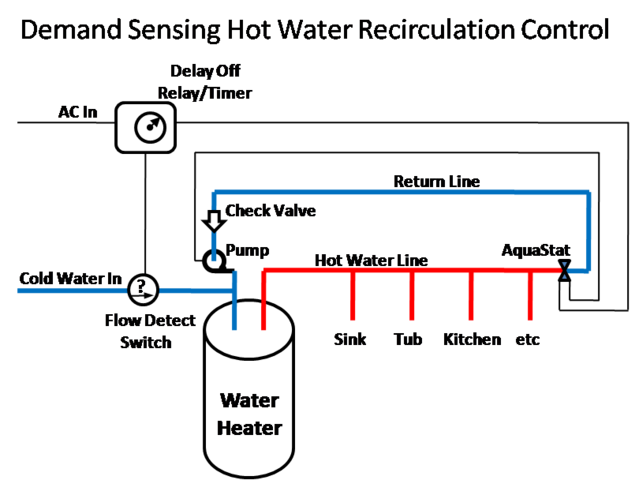
Before diving into reading techniques, let's talk about what's usually included in these diagrams. Most installation drawings feature several key elements that work together to show you how everything connects. First, there's the main water supply line, typically shown as a thick line representing incoming cold water. Then you'll see the hot water line, often marked with a different color or style to distinguish it from the cold side. The pump itself appears as a labeled component, sometimes drawn as a circle or rectangle with arrows showing direction. There are also various valves, pipes, and fittings that might be represented with standard plumbing symbols. Some diagrams include electrical connections if the pump requires power, while others might show temperature sensors or control devices. The most important thing to remember is that each symbol represents something specific in the real world, and understanding these representations is crucial to successful installation.
Understanding Basic Plumbing Symbols and Notation
The language of plumbing diagrams uses a set of standardized symbols that might seem cryptic at first. A straight line usually means a pipe, while a zigzag pattern indicates a valve or fitting. Circles often represent pumps, and arrows show the direction of flow. Sometimes you'll see triangles or other shapes indicating specific types of components. For instance, a triangle might represent a check valve that prevents backflow, while a square could indicate a shut-off valve. Pay attention to the labels next to these symbols – they often tell you exactly what type of component you're looking at. Some diagrams use different colors for different purposes: blue for cold water lines, red for hot water, and maybe green for electrical connections. It's worth noting that these conventions can vary slightly between different manufacturers or drafting standards, so always double-check the legend or key provided with each diagram. Remember, every symbol tells a story about how the system should function.
Following the Flow Path Through the System
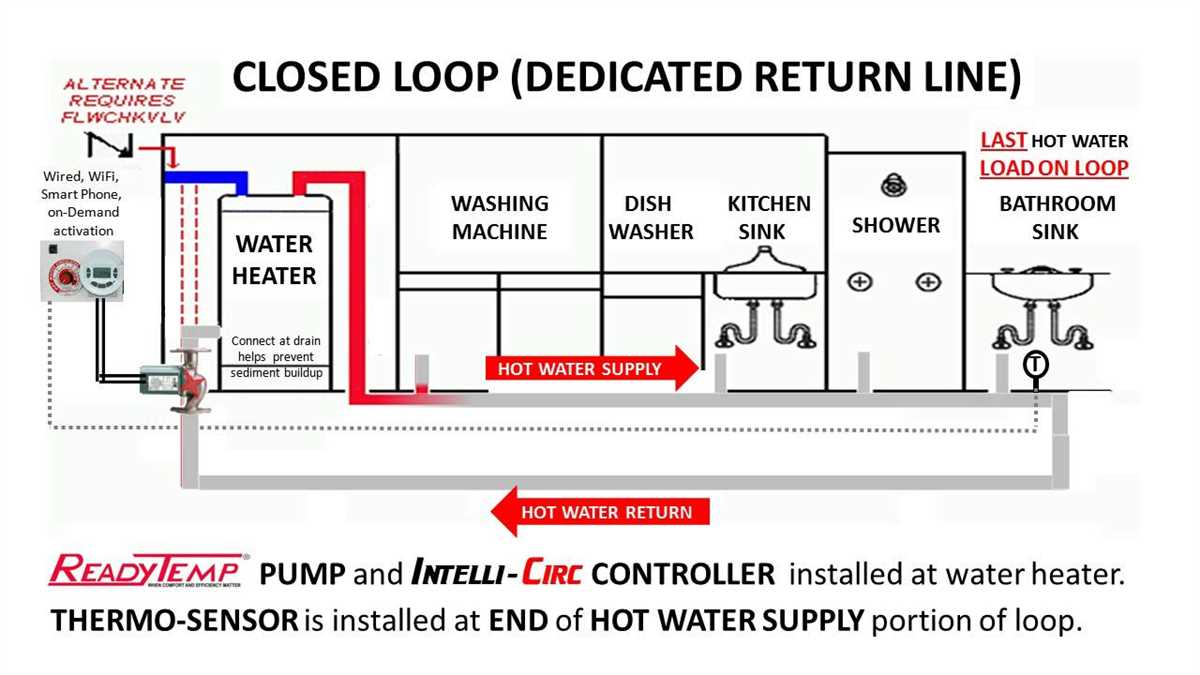
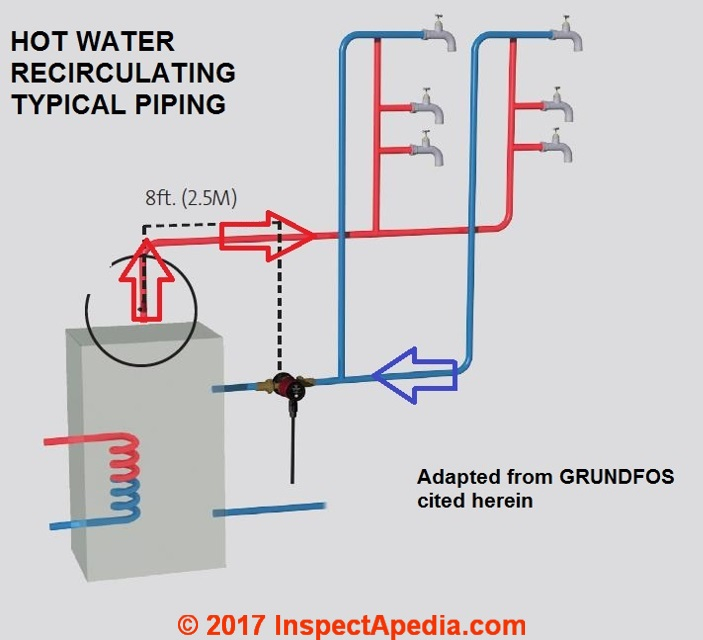
One of the most important skills in reading these diagrams is understanding the path that water takes through the entire system. Start at the main cold water supply and trace how the water moves through the pipes, past the heater, and then through the hot water distribution. Look for arrows that indicate flow direction – they're often critical for proper installation. Notice how the recirculating pump fits into this flow. In many cases, it's placed somewhere along the hot water return line, creating a loop that brings cooled water back to the heater. Sometimes the pump is positioned on the supply side, but the most common setup places it on the return path. This flow pattern is essential because it determines where you need to make connections and how the system will operate. If you're ever unsure about the correct direction, look for labels that specify 'inlet' and 'outlet' points, or check for directional arrows that clearly show how water should move through the pump.
Identifying Critical Components and Their Locations
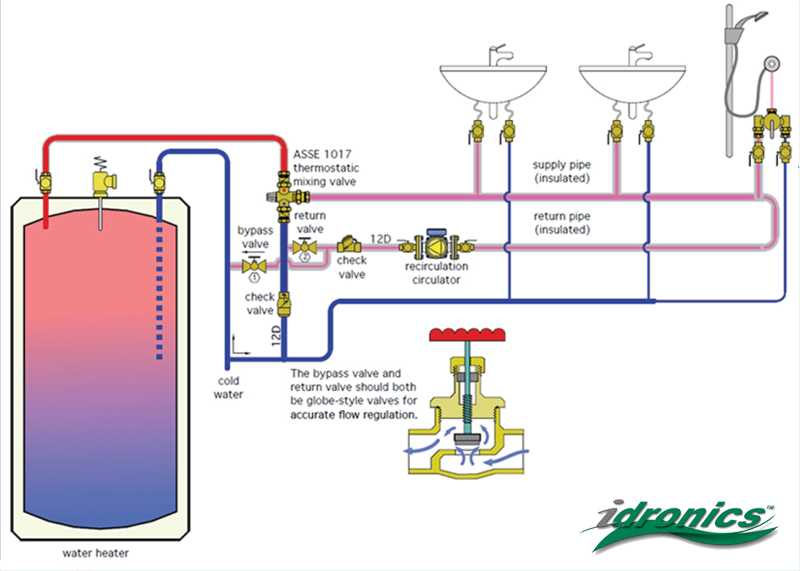
Every installation diagram highlights several key components that must be correctly placed for the system to work properly. The recirculating pump itself is usually the most prominent element, often labeled with its model number or specifications. You'll also find the hot water tank, which is typically shown as a large cylinder or rectangular shape. The diagram will indicate where the pump connects to the tank's outlet and return lines. Other important elements include temperature and pressure relief valves, which prevent dangerous pressure buildups. Check valves are another critical component – they ensure that water flows in only one direction, preventing backflow issues. Some diagrams also show mixing valves, which combine hot and cold water to provide the right temperature at the faucet. Take note of any control switches or thermostats that might regulate the pump's operation. Understanding where these components go helps avoid costly mistakes during installation.
Electrical Connections and Control Wiring Explained
Many modern recirculating pumps require electrical connections to function properly, and these aspects are usually included in installation diagrams. Look for electrical symbols that represent outlets, switches, or control circuits. Some diagrams show wiring schematics that illustrate how the pump connects to your home's electrical system. These may include separate circuits for the pump, especially if it's a high-powered model. Temperature sensors or thermostats might also appear on the diagram, showing how they connect to control the pump's operation based on water temperature. Pay attention to any labels indicating voltage requirements – most residential pumps work on 120 volts, but some commercial models require higher voltages. If you're not comfortable working with electrical components, consider consulting a licensed electrician. The wiring portion of the diagram can be particularly tricky for beginners, but understanding basic connections helps you communicate effectively with professionals if needed.
Common Mistakes to Avoid When Reading Diagrams
Even experienced professionals sometimes misread installation diagrams, leading to installation errors that can cause problems later. One frequent mistake is ignoring the flow direction indicators – connecting a pump backwards can actually damage it or prevent it from working properly. Another common error is overlooking the differences between various pipe sizes or connection types. Some diagrams might show standard fittings while your actual plumbing uses different ones. Also, don't skip the legend or key that explains what all the symbols mean – it's easy to misinterpret a triangle as a regular fitting instead of recognizing it as a check valve. Many people rush through the diagram reading process, missing important details about where to place certain components. Finally, failing to verify that all necessary components are included in your specific installation can lead to incomplete setups. Remember, a well-read diagram is only as good as the careful attention you give to every detail.
Practical Tips for Successful Installation
Once you've learned to read your diagram, practical application becomes much easier. Before starting any physical work, make sure you have a complete understanding of the entire system layout. Sketch out your own version of the diagram if that helps clarify things for you. Always double-check measurements and distances before cutting pipes or mounting components. Take photos of your existing plumbing as reference points, especially if you're replacing an older system. Don't forget to verify that all required parts are available before beginning installation. Consider using a flashlight to examine hard-to-see areas of the diagram, and don't hesitate to consult with experienced plumbers if you're unsure about anything. Finally, remember that safety should always come first – turn off water and electricity before starting any work. These steps might seem obvious, but they save countless hours of troubleshooting later.
Troubleshooting Based on Diagram Understanding
Knowing how to read installation diagrams gives you a powerful tool for diagnosing problems when they arise. If hot water isn't reaching a particular fixture quickly enough, check whether the diagram shows that fixture being served by the recirculation loop. If a pump isn't running when it should, review the electrical connections shown in the diagram to ensure they match your installation. Problems with water temperature might stem from incorrect placement of temperature controls or sensors. Understanding the flow paths helps you identify where blockages or leaks might occur. When you can visualize the entire system from the diagram, you're better equipped to pinpoint where issues originate. This knowledge is invaluable for both routine maintenance and emergency repairs. Plus, it makes communicating with service technicians much more effective since you can accurately describe what the system should look like versus what you're experiencing.
Making Your Own Diagrams for Future Reference
After successfully installing a recirculating pump, consider creating your own simplified diagram for future reference. This personal version can help you remember important details like where the pump was installed, what type of connections were made, and how the system operates. Include notes about any modifications you made to the original design, as well as measurements and component specifications. This custom diagram becomes a handy resource for maintenance tasks or when planning similar installations in other parts of your home. It also helps you explain the system to others, whether it's family members or professional service providers. Having a clear visual representation of your specific installation makes troubleshooting much faster and reduces confusion during future work.
When to Seek Professional Help
While understanding installation diagrams empowers you to handle many tasks yourself, there are situations where professional assistance is necessary. If you're dealing with complex plumbing layouts or unusual building configurations, a qualified plumber can provide valuable insight. Electrical concerns, particularly those involving high-voltage connections or complex control systems, should be handled by certified electricians. Additionally, if you're unsure about any aspect of the diagram interpretation or feel uncomfortable with any part of the installation process, don't hesitate to call for help. Remember, the goal isn't just to complete the job but to do it safely and correctly. Professional help ensures that your system meets local codes and will function reliably for years to come. Sometimes the investment in expert advice pays dividends in peace of mind and long-term performance.
Reading and interpreting hot water recirculating pump installation diagrams is a skill that bridges the gap between theory and practice in home plumbing. While these diagrams might seem intimidating at first, breaking them down into manageable parts reveals their logical structure and helpful purpose. From understanding basic symbols to tracing water flow paths, each element contributes to a complete picture of how your system works. The more familiar you become with these diagrams, the more confident you'll feel when tackling installation projects or troubleshooting problems. Whether you're doing the work yourself or collaborating with professionals, having a solid grasp of diagram reading enhances communication and improves outcomes. So next time you encounter one of these technical drawings, don't panic – instead, embrace it as an opportunity to better understand your home's water heating system. After all, a little knowledge goes a long way toward keeping your household running smoothly.

Related Posts
What happens to dried ink when clothes go through dryer tumbling

The hidden perks of installing solar heating systems in your property

How American Standard HVAC Systems Compare to Trane Brands
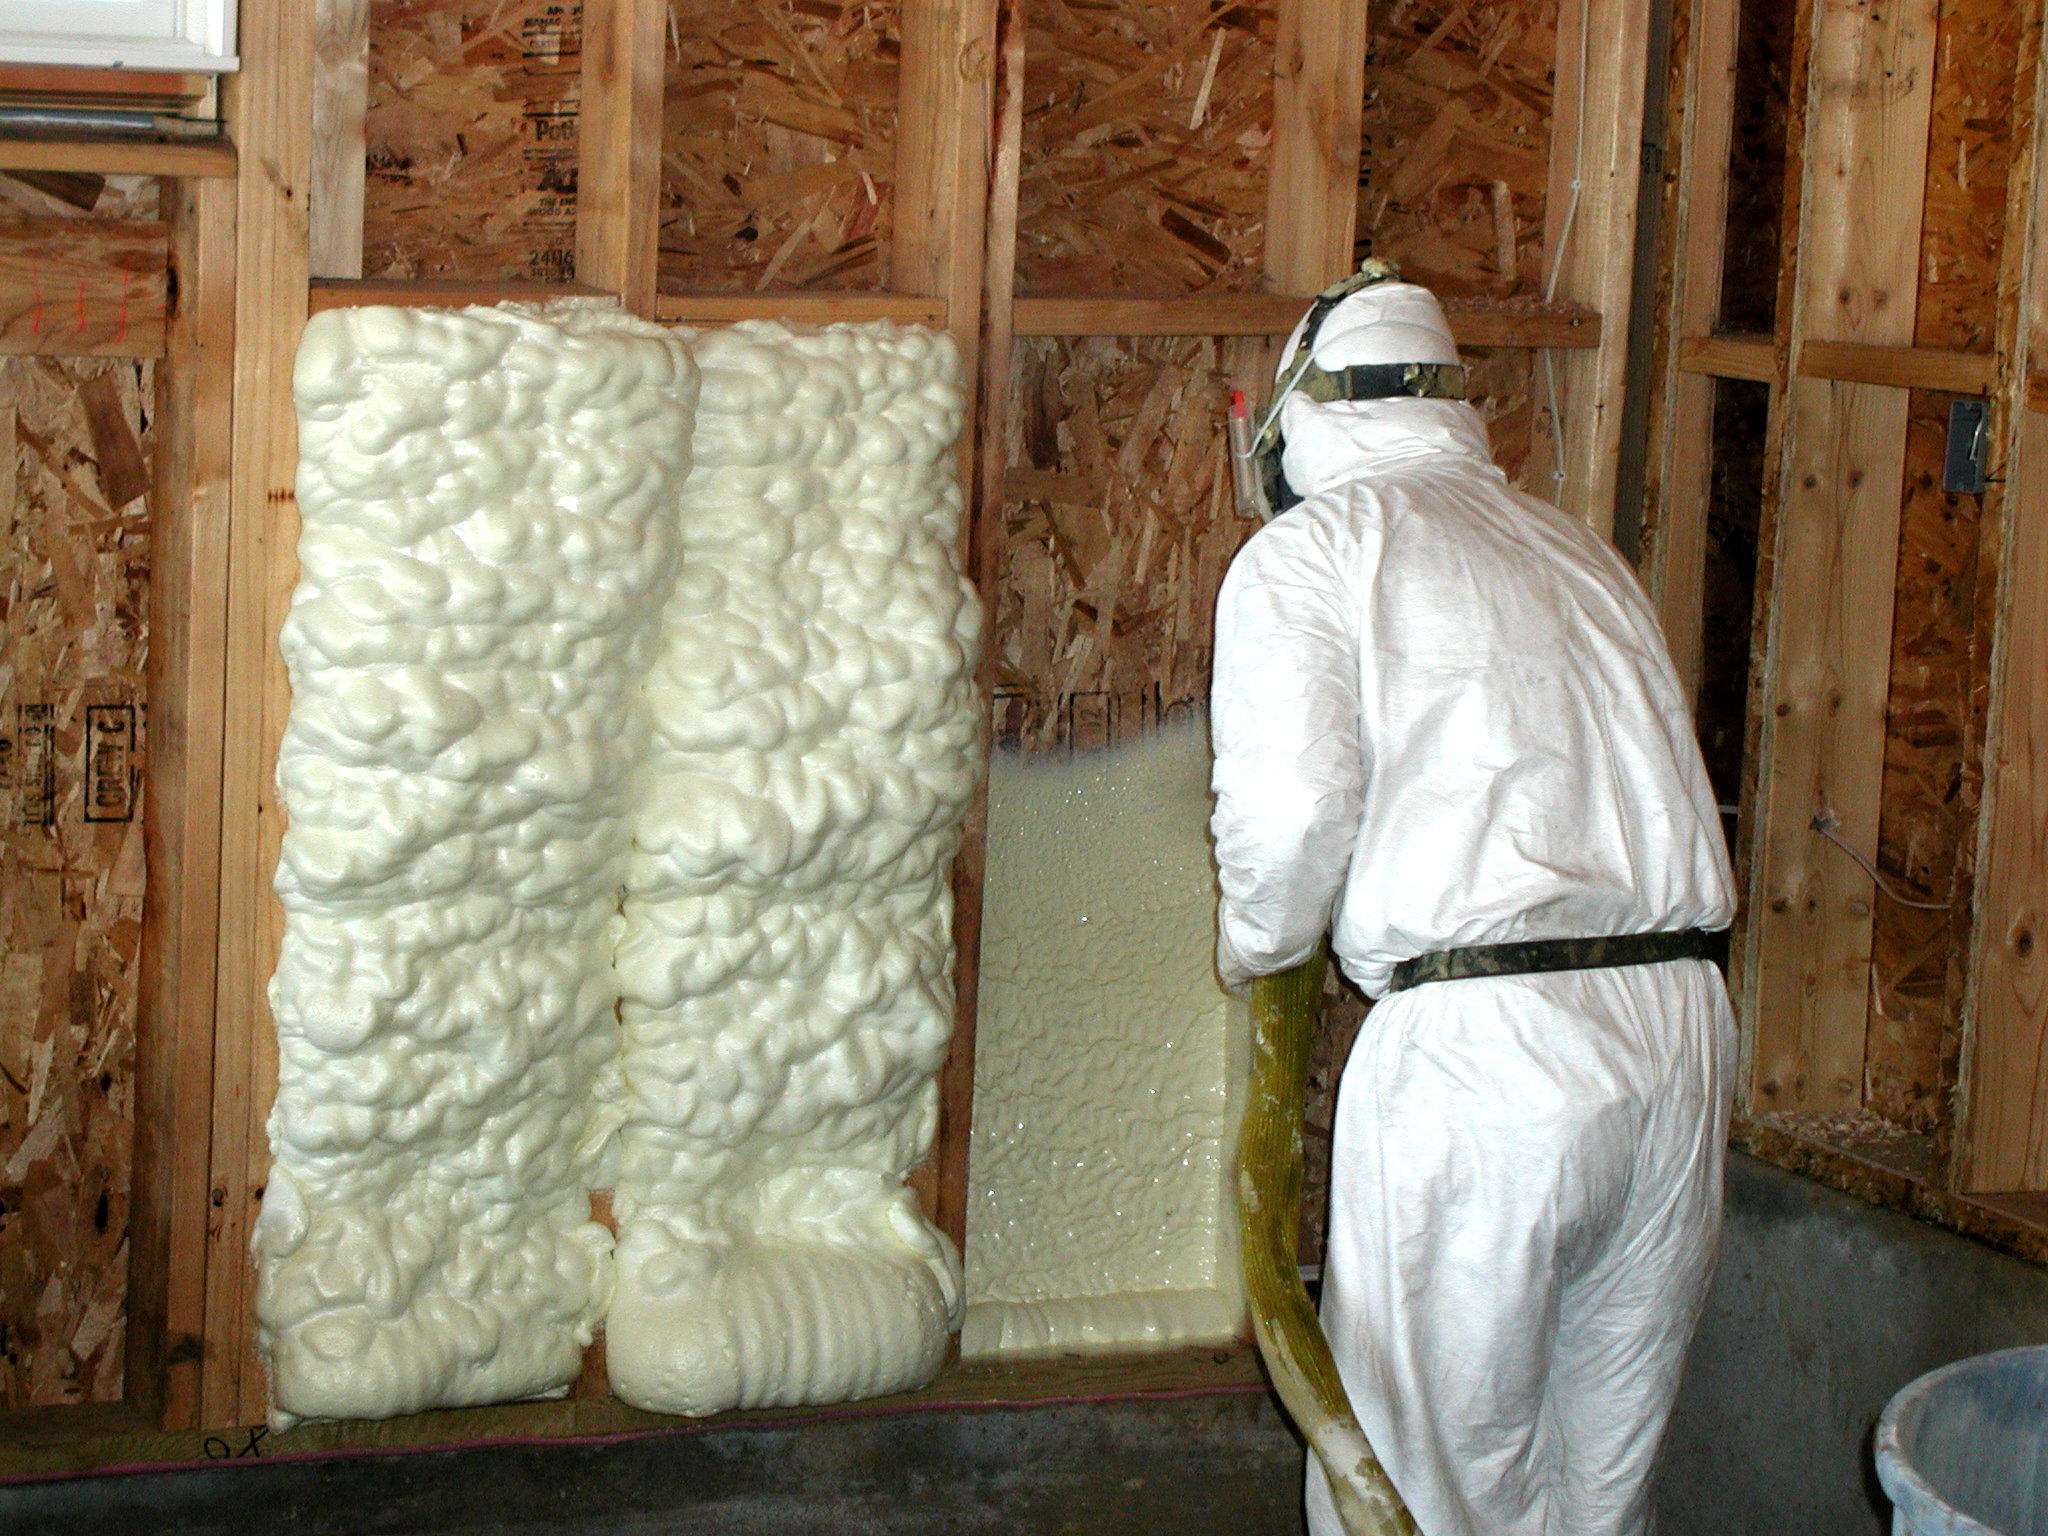
Breaking down spray foam insulation costs by type and coverage area

How to Effectively Eliminate Clover from Your Lawn Naturally

