The Victory Side Chair, a timeless piece of furniture, holds a special place in many homes. Its simple yet elegant design makes it a versatile addition to any room. However, over time, these chairs can show signs of wear and tear. This guide will walk you through the process of restoring and maintaining your Victory Side Chair, ensuring it remains a cherished item for generations. We'll cover everything from identifying the chair's components to the step-by-step restoration process and ongoing care. Get ready to breathe new life into your furniture and keep it looking its best. This guide is for anyone who wants to preserve the beauty and functionality of their Victory Side Chairs, from DIY enthusiasts to those looking to learn more about furniture care. Let's get started!
Owning a Victory Side Chair is like owning a little piece of history. These chairs, often made from wood, metal, or a combination of both, have a classic charm that never goes out of style. But, life happens. Scratches appear, the finish fades, and the chair might start to wobble. Don’t despair! Restoring a Victory Side Chair is a rewarding project that can bring significant satisfaction. This guide will provide you with the knowledge and the practical steps needed to bring your chair back to its former glory and, maybe even more importantly, how to take care of it afterwards. We’ll break down the process into manageable steps, making it approachable even for beginners. Prepare to get hands-on and rediscover the beauty of your Victory Side Chair.
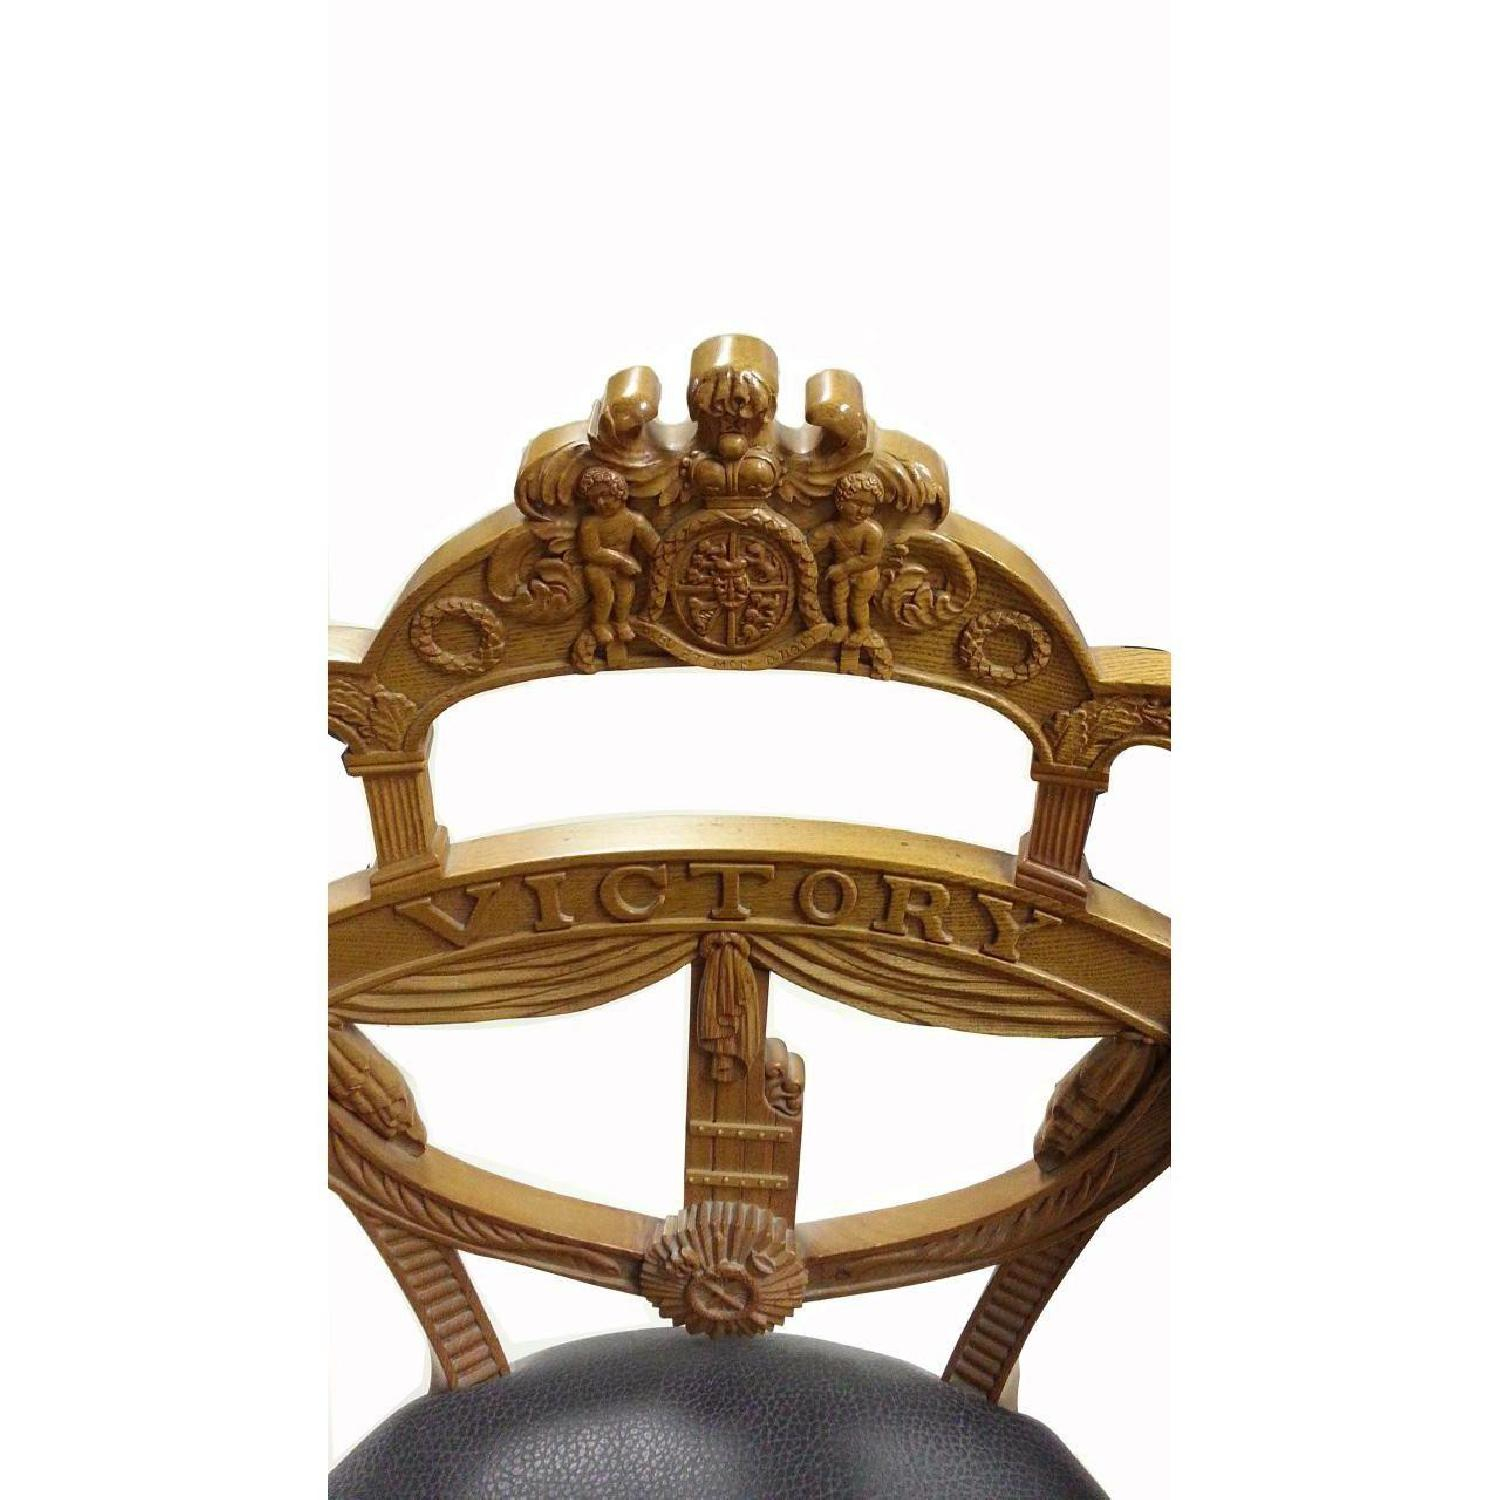
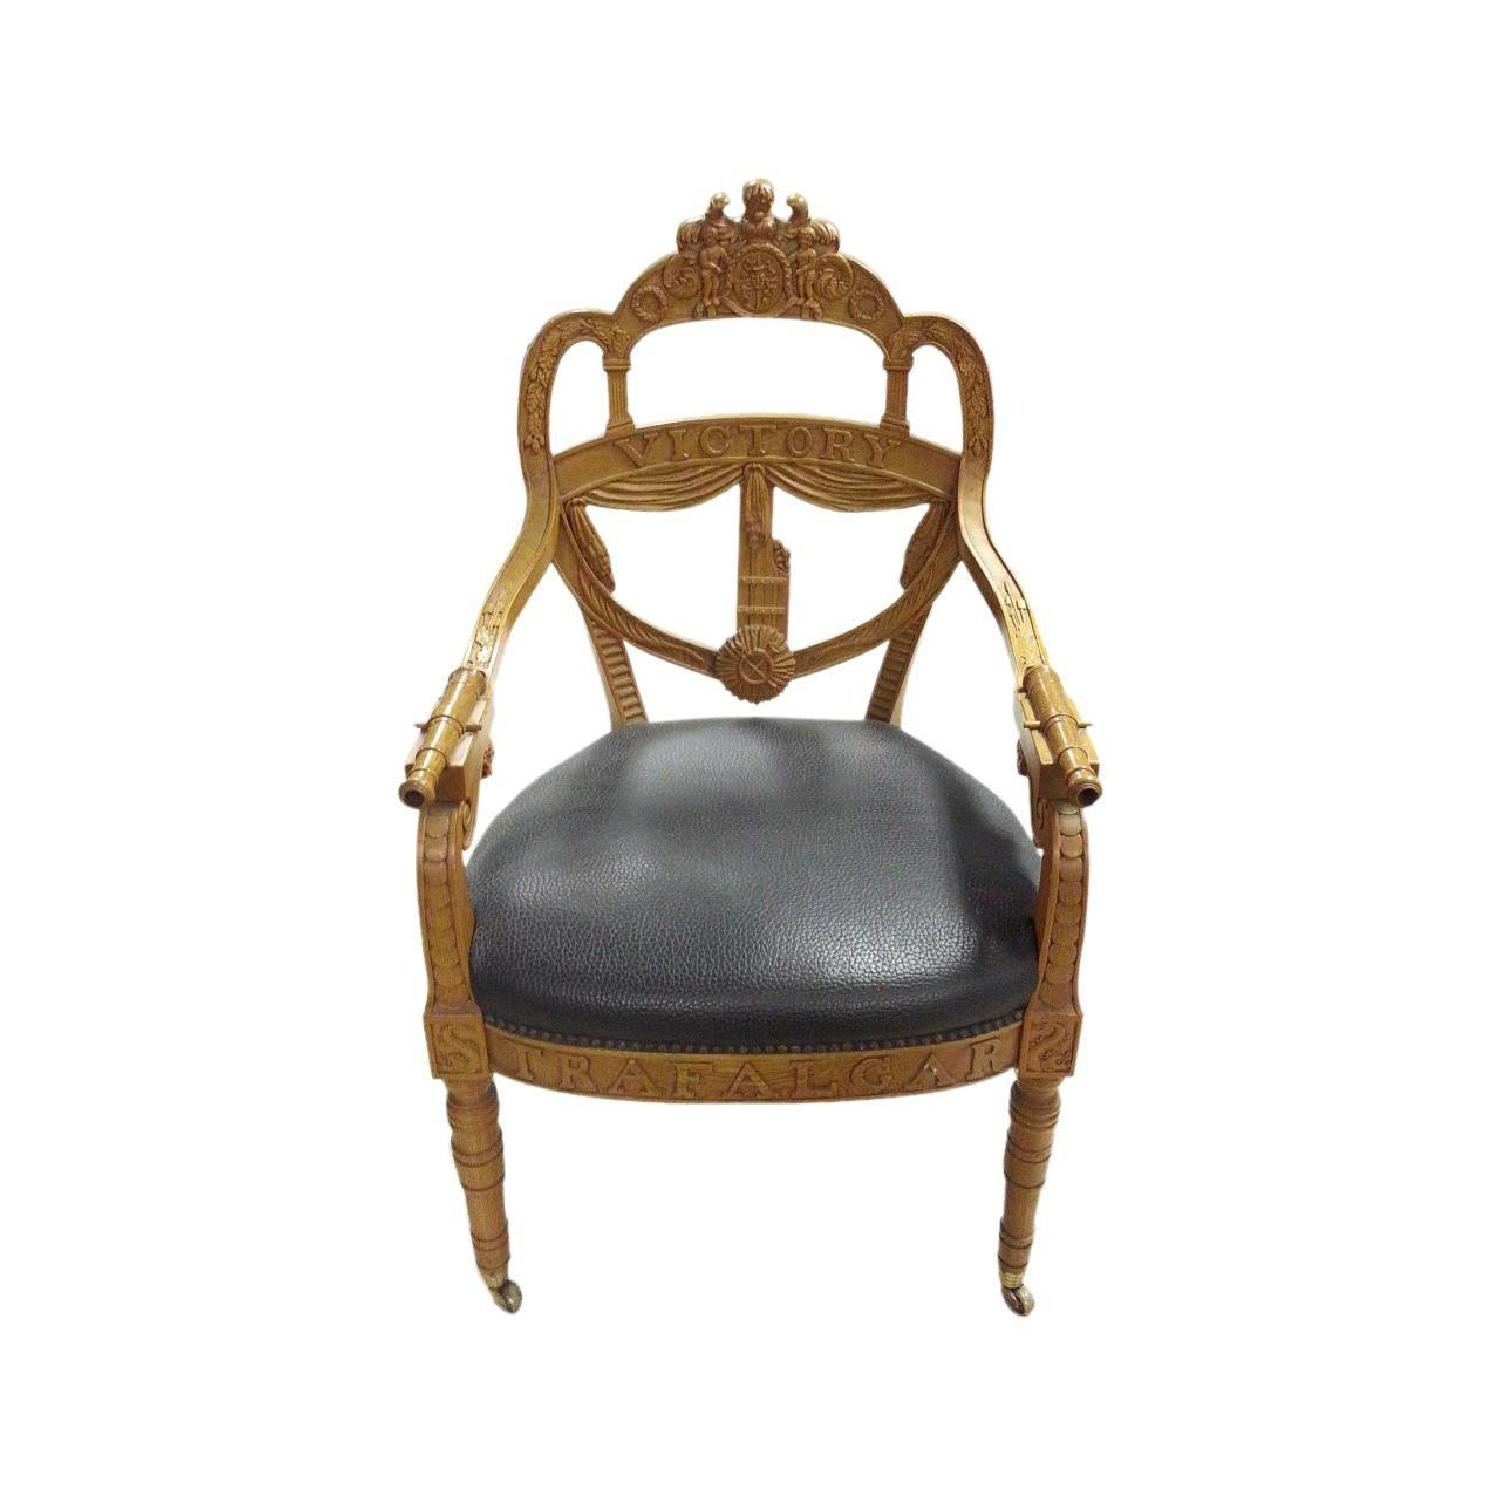
1. Understanding Your Victory Side Chair: Anatomy and Materials
Before you start any restoration project, it's crucial to understand your chair. Victory Side Chairs come in various designs, but most share common elements.
- The Frame: Usually made of wood (oak, walnut, or beech are common) or metal (steel or aluminum). Inspect for cracks, loose joints, or rust.
- The Seat: Can be made of wood, upholstered (fabric or leather), or have a woven seat (cane or rush). Assess the condition of the seat and its attachments.
- The Finish: The finish protects the wood and gives the chair its color. Common finishes include varnish, lacquer, and paint. Check for scratches, fading, or peeling.
- Hardware: Screws, bolts, and other fasteners. Make sure they are secure and free of rust.
Knowing the materials and construction of your chair will guide your restoration efforts. For example, a wooden chair will require different treatment than a metal one. Identifying the type of finish will dictate the appropriate cleaning and refinishing methods. Take the time to thoroughly examine your chair before you get started. It helps to know what you're working with.
2. Gathering Your Tools and Supplies: What You'll Need
Having the right tools and supplies is key to a successful restoration. Here’s a list of essentials:
- For Wood Chairs:
- Sandpaper (various grits: coarse, medium, fine)
- Sanding block or orbital sander (optional, but helpful)
- Wood filler (for filling cracks and imperfections)
- Wood stain (optional, to restore color)
- Finish (varnish, lacquer, or polyurethane)
- Paint brushes or spray gun (for applying finish)
- Clean cloths
- Safety glasses, gloves, and a dust mask
- For Metal Chairs:
- Wire brush or sandpaper (for removing rust)
- Rust remover or converter
- Primer (for metal)
- Paint (exterior grade, if the chair is outdoors)
- Paint brushes or spray gun
- Clean cloths
- Safety glasses, gloves, and a dust mask
- For All Chairs:
- Screwdrivers (Phillips head and flathead)
- Wrench or pliers (for bolts)
- Wood glue (for loose joints)
- Cleaning solution (mild soap and water)
- Vacuum cleaner (for removing dust and debris)
It's smart to test any cleaning solutions or finishes on an inconspicuous area first to ensure they don't damage the chair. It's always better to be safe than sorry.
3. Step-by-Step Restoration: Bringing Your Chair Back to Life
The restoration process will vary depending on your chair's condition and materials. Here's a general guide:
- Step 1: Preparation. Disassemble the chair as much as possible. Remove the seat (if detachable). Take off any hardware. Clean the chair thoroughly with a mild soap and water solution. Let it dry completely.
- Step 2: Repair. Address any structural issues. Tighten loose joints with wood glue and clamps. Fill cracks and imperfections with wood filler. For metal chairs, remove rust with a wire brush, sandpaper, or rust remover. Apply a rust converter if necessary.
- Step 3: Sanding and Refinishing (for Wood Chairs). Sand the wood to remove the old finish and prepare the surface for refinishing. Start with a coarse grit sandpaper and work your way to a fine grit. Apply wood stain (if desired) and let it dry. Apply multiple coats of finish, sanding lightly between coats. Allow each coat to dry completely.
- Step 4: Priming and Painting (for Metal Chairs). Apply a metal primer to the cleaned and prepped metal surface. Let it dry. Apply several coats of paint, allowing each coat to dry completely.
- Step 5: Reassembly. Reassemble the chair, replacing any hardware. Attach the seat. Double-check that all screws and bolts are securely tightened.
- Step 6: Finishing Touches. Clean the chair one last time. Consider applying a furniture polish or wax to protect the finish and add shine. It's a good idea to inspect your work and make any necessary adjustments.
4. Restoring Upholstered or Woven Seats
Upholstered and woven seats require specialized care.
- Upholstered Seats:
- Remove the old fabric and padding.
- Inspect the frame and webbing (if present). Repair or replace as needed.
- Cut new fabric and padding to size.
- Reupholster the seat, stretching the fabric tightly and securing it with staples or tacks.
- Woven Seats (Cane or Rush):
- Carefully remove the old seat. This can be tricky and may require professional help, depending on the damage.
- Clean the frame.
- Re-cane or re-rush the seat using appropriate materials and techniques. This often involves soaking the cane or rush to make it flexible.
Upholstery or weaving is a skill that takes time to master. If you are not comfortable with these tasks, it's best to seek the help of a professional upholsterer or weaver.
5. Maintaining Your Victory Side Chair: Protecting Your Investment
Regular maintenance is essential to keep your restored Victory Side Chair looking its best. Here's how:
- Cleaning: Dust the chair regularly with a soft cloth. Wipe up spills immediately. Use a mild cleaning solution for more stubborn stains. Avoid harsh chemicals or abrasive cleaners.
- Protection: Protect the chair from direct sunlight, which can fade the finish. Use coasters to protect the surface from water rings. Place felt pads under the legs to protect flooring.
- Inspection: Periodically inspect the chair for loose joints, scratches, or other damage. Address any issues promptly to prevent them from worsening.
- Climate Control: If the chair is made of wood, avoid extreme temperature or humidity fluctuations, which can cause the wood to expand and contract, potentially leading to cracks.
By following these maintenance tips, you can prolong the life of your Victory Side Chair for many years, keeping it in great condition.
6. Common Mistakes to Avoid and Troubleshooting
Restoration can be tricky, and mistakes happen. Here are some common pitfalls to avoid:
- Rushing the Process: Take your time and don't cut corners. Proper preparation is key.
- Using the Wrong Materials: Make sure you use the correct type of finish, glue, and other materials for your chair's specific construction. Always do your research.
- Ignoring Safety Precautions: Always wear safety glasses, gloves, and a dust mask when working with chemicals or power tools.
- Over-Sanding: Avoid sanding through the veneer (a thin layer of wood) on your chair. Be careful and use the right grit sandpaper.
- Inadequate Ventilation: Work in a well-ventilated area when using solvents, finishes, and paints.
If you run into problems, don't hesitate to seek help from online forums, DIY communities, or professional restorers. Don't be afraid to ask for help!
Restoring a Victory Side Chair is an investment in both time and effort, and the reward is a beautiful piece of furniture with a rich history. By following the steps outlined in this guide, you can bring your chair back to life and enjoy it for many years to come. Remember that patience, attention to detail, and proper maintenance are key to success. Take pride in your work, and cherish the legacy of your beautifully restored Victory Side Chair. The process is challenging, but the result is very satisfying. You've preserved a piece of the past and created something beautiful for the future. Congratulations on your efforts, and enjoy your restored chair. You did it!